Fuel is an open-source software application that simplifies the deployment of highly available OpenStack environments, as well as enables you to manage your OpenStack environments after deployment.

Download Fuel ISO

Download Fuel community version from www.fuel-infra.org/

Last Stable Release is fuel-community-9.0 here is the ISO.TORRENT

Create a VM for Fuel

Hardware requirement

For a production: Quad-core CPU 4 GB RAM 10 Gigabit network port Disk size depends on the number of deployed nodes. All nodes send logs to the Fuel Master node using rsyslog. During installation, Fuel creates a separate partition for /var to store the remote logs and allocates 40% of the disk size to it. Our recommendation for the remote logs partition is 20 GB per node. If you deploy 10 nodes with Fuel, you need to have a (20 x 10) x 2.5 = 500 GB disk for the Fuel Master node. IPMI access through an independent management network

For a testing environment: Dual-core CPU 2 GB RAM 1 Gigabit network port 50 GB disk Physical console access

Here is my VM spec:

Enable ip forward, 0 disable, 1 enbale

net.ipv4.ip_forward = 0

Enable reverse path filtering

net.ipv4.conf.all.rp_filter = 1

The accept_source_route option causes network interfaces to accept packets with the Strict Source Route (SSR) or Loose Source Routing (LSR) option set.

net.ipv4.conf.default.accept_source_route = 0

Magic SysRq key is a key sequence that allows some basic commands to be passed directly to the kernel.

Here is the list of possible values in /proc/sys/kernel/sysrq:

0 - disable sysrq completely

1 - enable all functions of sysrq

1 - bitmask of allowed sysrq functions (see below for detailed function description):

      2 =   0x2 - enable control of console logging level
      
      4 =   0x4 - enable control of keyboard (SAK, unraw)
      
      8 =   0x8 - enable debugging dumps of processes etc.
      
     16 =  0x10 - enable sync command
     
     32 =  0x20 - enable remount read-only
     
     64 =  0x40 - enable signalling of processes (term, kill, oom-kill)
     
    128 =  0x80 - allow reboot/poweroff
    
    256 = 0x100 - allow nicing of all RT tasks
kernel.sysrq = 16

core_uses_pid:

The default coredump filename is “core”. By setting core_uses_pid to 1, the coredump filename becomes core.PID.

If core_pattern does not include “%p” (default does not) and core_uses_pid is set, then .PID will be appended to the filename.

kernel.core_uses_pid = 1

The msgmnb tunable specifies the maximum allowable total combined size of all messages queued in a single System V IPC message queue at one time, in bytes.

The default is 16384.

kernel.msgmnb = 16384

The msgmax tunable specifies the maximum allowable size of any single message in a System V IPC message queue, in bytes. msgmax must be no larger than msgmnb (the size of the queue).

kernel.msgmax = 8192

The msgmni tunable specifies the maximum number of system-wide System IPC message queue identifiers (one per queue). The default is 16.

kernel.msgmni = 7902

This file can be used to query and set the run-time limit on the maximum System V IPC shared memory segment size that can be created. It could be max physical memory Byte -1. For example: for 64 GB phyical system, kernel.shmmax = (6410241024*1024)-1 = 68719476735

kernel.shmmax = 4294967295

In most cases this setting should be sufficient since it means that the total amount of shared memory available on the system is 2097152x4096 bytes. (shmallxPAGE_SIZE) which is 8 GB.

PAGE_SIZE is usually 4096 bytes.

For a system have 16GB phyical menmory kernel.shmall = (1610241024)/4 = 4194304

kernel.shmall = 268435456

net.ipv4.conf.default.arp_announce - INTEGER

Define different restriction levels for announcing the local source IP address from IP packets in ARP requests sent on interface:

    0 - (default) Use any local address, configured on any interface
    
    1 - Try to avoid local addresses that are not in the target's subnet for this interface. This mode is useful when target hosts reachable via this interface require the source IP address in ARP requests to be part of their logical network configured on the receiving interface. When we generate the	request we will check all our subnets that include the	target IP and will preserve the source address if it is from	such subnet. If there is no such subnet we select source	address according to the rules for level 2.
    
    2 - Always use the best local address for this target.	In this mode we ignore the source address in the IP packet	and try to select local address that we prefer for talks with	the target host. Such local address is selected by looking	for primary IP addresses on all our subnets on the outgoing	interface that include the target IP address. If no suitable	local address is found we select the first local address	we have on the outgoing interface or on all other interfaces,	with the hope we will receive reply for our request and	even sometimes no matter the source IP address we announce.

The max value from conf/{all,interface}/arp_announce is used.

Increasing the restriction level gives more chance for receiving answer from the resolved target while decreasing the level announces more valid sender’s information.

net.ipv4.conf.default.arp_ignore - INTEGER

Define different modes for sending replies in response to received ARP requests that resolve local target IP addresses:

    0 - (default): reply for any local target IP address, configured	on any interface
    
    1 - reply only if the target IP address is local address	configured on the incoming interface
    
    2 - reply only if the target IP address is local address	configured on the incoming interface and both with the	sender's IP address are part from same subnet on this interface.
    
    3 - do not reply for local addresses configured with scope host,	only resolutions for global and link addresses are replied
    
    4-7 - reserved
    
    8 - do not reply for all local addresses

The max value from conf/{all,interface}/arp_ignore is used when ARP request is received on the {interface}

To disable ARP for VIP at real servers, we just need to set arp_announce/arp_ignore sysctls at the interface connected to the VIP network. For example, real servers have eth0 connected to the VIP network with the VIP at interface lo, we will have the following commands.

net.ipv4.conf.eth0.arp_ignore = 1
net.ipv4.conf.eth0.arp_announce = 2

net.core.rmem_max

The net.core.rmem_max setting defines the maximum receive socket buffer size in bytes.

There are a few different settings that all appear to be very similar. You can see that on Ubuntu 15.04 (3.18.0-13-generic) the default value for net.core.rmem_max is 212992. The default and max values are the same in this case. Raising this to a larger value will increase the buffer size, but this can have nasty effects in terms of “buffer bloat”

I highly suggest reading about the current state of Linux networking by checking out this article - http://lwn.net/Articles/616241/

net.core.rmem_default = 212992
net.core.rmem_max = 212992

net.core.wmem_max

The net.core.wmem_max setting defines the maximum send socket buffer size in bytes.

You can see that on Ubuntu 15.04 (3.18.0-13-generic) the default value for net.core.wmem_max is 212992, which is the same size as rmem_max. Raising this to a larger value will increase the send buffer size, but before you adjust this setting

I highly suggest reading about the current state of Linux networking by checking out this article - http://lwn.net/Articles/616241/

net.core.wmem_default = 212992
net.core.wmem_max = 212992

net.ipv4.tcp_wmem

tcp_wmem (since Linux 2.4) This is a vector of 3 integers: [min, default, max].

These parameters are used by TCP to regulate send buffer sizes. TCP dynamically adjusts the size of the send buffer from the default values listed below, in the range of these values, depending on memory available.

min Minimum size of the send buffer used by each TCP socket. The default value is the system page size. (On Linux 2.4, the default value is 4K bytes.)

This value is used to ensure that in memory pressure mode, allocations below this size will still succeed. This is not used to bound the size of the send buffer declared using SO_SNDBUF on a socket.

default The default size of the send buffer for a TCP socket. This value overwrites the initial default buffer size from the generic global net.core.wmem_default defined for all protocols.

The default value is 16K bytes.If larger send buffer sizes are desired, this value should be increased (to affect all sockets).

To employ large TCP windows, the /proc/sys/net/ipv4/tcp_window_scaling must be set to a non-zero value (default).

max The maximum size of the send buffer used by each TCP socket. This value does not override the value in /proc/sys/net/core/wmem_max.

This is not used to limit the size of the send buffer declared using SO_SNDBUF on a socket.

The default value is calculated using the formula: max(65536, min(4MB, tcp_mem[1]*PAGE_SIZE/128))

net.ipv4.tcp_wmem = 4096        16384   4194304

The tcp_mem variable defines how the TCP stack should behave when it comes to memory usage.

[1] specified in the tcp_mem variable tells the kernel the low threshold. Below this point, the TCP stack do not bother at all about putting any pressure on the memory usage by different TCP sockets.

[2] tells the kernel at which point to start pressuring memory usage down.

[3] tells the kernel how many memory pages it may use maximally. If this value is reached, TCP streams and packets start getting dropped until we reach a lower memory usage again.

net.ipv4.tcp_mem = 92451        123271  184902

location

/etc/sysconfig/iptables

Start, Stop, Save

service iptables stop
service iptables start
service iptables restart
service iptables save

Structure

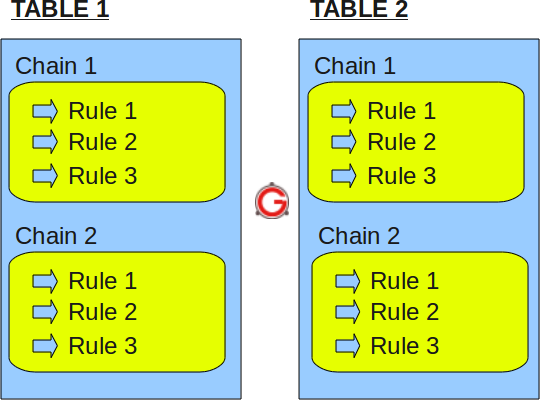
** iptables -> tables -> chains -> rules **

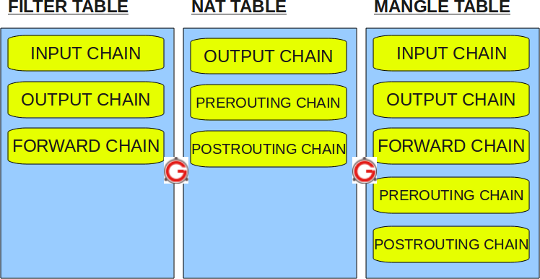
** There are four kinds built-in tables: Filter, NAT, Mangle and Raw.**

Filter Table

Filter is default table for iptables. It has the following built-in chains.

  • INPUT chain - Incoming to firewall. For packets coming to the local server.
  • OUTPUT chain - Outgoing from firewall. For packets generated locally and going out of the local server.
  • FORWARD chain - Packet for another NIC on the local server . For packets routed through the local server.

NAT Table

Iptables’s NAT table has the following built-in chains.

  • PREROUTING chain - Alters packets before routing.i.e Packet translation happens immediately after the packet come to the system (and before routing). This helps to translate the destination ip address of the packets to something that matches the routing on the local server. This is used for DNAT (destination NAT).
  • POSTROUTING chain – Alters packets after routing. i.e Packet translation happens when the packets are leaving the system. This helps to translate the source ip address of the packets to something that might match the routing on the desintation server. This is used for SNAT (source NAT).
  • OUTPUT chain – NAT for locally generated packets on the firewall.

Mangle table

Iptables’s Mangle table is for specialized packet alteration. This alters QOS bits in the TCP header. Mangle table has the following built-in chains.

  • PREROUTING chain
  • OUTPUT chain
  • FORWARD chain
  • INPUT chain
  • POSTROUTING chain

Raw table

Iptable’s Raw table is for configuration excemptions. Raw table has the following built-in chains.

  • PREROUTING chain
  • OUTPUT chain

Iptables Rules

Following are the key points to remember for the iptables rules.

  • Rules contain a criteria and a target.
  • If the criteria is matched, it goes to the rules specified in the target (or) executes the special values mentioned in the target.
  • If the criteria is not matached, it moves on to the next rule.

Target Values

Following are the possible special values that you can specify in the target.

  • ACCEPT – Firewall will accept the packet.
  • DROP – Firewall will drop the packet.
  • QUEUE – Firewall will pass the packet to the userspace.
  • RETURN – Firewall will stop executing the next set of rules in the current chain for this packet. The control will be returned to the calling chain.

If you do iptables –list (or) service iptables status, you’ll see all the available firewall rules on your system. The following iptable example shows that there are no firewall rules defined on this system. As you see, it displays the default input table, with the default input chain, forward chain, and output chain.

$ iptables -t filter --list
Chain INPUT (policy ACCEPT)
target     prot opt source               destination         

Chain FORWARD (policy ACCEPT)
target     prot opt source               destination         

Chain OUTPUT (policy ACCEPT)
target     prot opt source               destination

Do the following to view the mangle table.

$ iptables -t mangle --list

Do the following to view the nat table.

$ iptables -t nat --list

Do the following to view the raw table.

$ iptables -t raw --list

Note: If you don’t specify the -t option, it will display the default filter table. So, both of the following commands are the same.

$ iptables -t filter --list
(or)
$ iptables --list

The following iptable example shows that there are some rules defined in the input, forward, and output chain of the filter table.

$ iptables --list
Chain INPUT (policy ACCEPT)
num  target     prot opt source               destination
1    RH-Firewall-1-INPUT  all  --  0.0.0.0/0            0.0.0.0/0

Chain FORWARD (policy ACCEPT)
num  target     prot opt source               destination
1    RH-Firewall-1-INPUT  all  --  0.0.0.0/0            0.0.0.0/0

Chain OUTPUT (policy ACCEPT)
num  target     prot opt source               destination

Chain RH-Firewall-1-INPUT (2 references)
num  target     prot opt source               destination
1    ACCEPT     all  --  0.0.0.0/0            0.0.0.0/0
2    ACCEPT     icmp --  0.0.0.0/0            0.0.0.0/0           icmp type 255
3    ACCEPT     esp  --  0.0.0.0/0            0.0.0.0/0
4    ACCEPT     ah   --  0.0.0.0/0            0.0.0.0/0
5    ACCEPT     udp  --  0.0.0.0/0            224.0.0.251         udp dpt:5353
6    ACCEPT     udp  --  0.0.0.0/0            0.0.0.0/0           udp dpt:631
7    ACCEPT     tcp  --  0.0.0.0/0            0.0.0.0/0           tcp dpt:631
8    ACCEPT     all  --  0.0.0.0/0            0.0.0.0/0           state RELATED,ESTABLISHED
9    ACCEPT     tcp  --  0.0.0.0/0            0.0.0.0/0           state NEW tcp dpt:22
10   REJECT     all  --  0.0.0.0/0            0.0.0.0/0           reject-with icmp-host-prohibited

The rules in the iptables –list command output contains the following fields:

  • num – Rule number within the particular chain
  • target – Special target variable that we discussed above
  • prot – Protocols. tcp, udp, icmp, etc.,
  • opt – Special options for that specific rule.
  • source – Source ip-address of the packet
  • destination – Destination ip-address for the packet

We use the du command to find out what take the space of the disk in linux systems.

Most Useful

$ du -h --max-depth=1 /
77M     /boot
0       /dev
172K    /home
0       /proc
65M     /run
0       /sys
23M     /etc
176K    /root
4.0K    /tmp
463M    /var
976M    /usr
0       /media
0       /mnt
0       /opt
11M     /srv
1.6G    /

Using du With Filters

du -h --max-depth=1 / | sort -n
0       /dev
0       /media
0       /mnt
0       /opt
0       /proc
0       /sys
1.6G    /
4.0K    /tmp
11M     /srv
23M     /etc
65M     /run
77M     /boot
172K    /home
176K    /root
463M    /var
976M    /usr

Local access or SSH access to the system, run commands with ipmitool and IPMICFG to attempt to regain accessibility to IPMI.

Resets the management console without rebooting the BMC

$ ipmitool mc reset warm

Reboots the BMC

$ ipmitool mc reset cold

If this fails to restore usability of the interface, you can also attempt a cold reset from Supermicro’s IPMICFG.

$ ipmicfg -nm reset

Finally, you can reset the BMC to factory defaults with IPMICFG or ipmitool. Be aware that this will wipe any existing settings on the BMC that you may have set from the web interface, but excludes network settings.

$ ipmicfg -fd

or

$ ipmitool raw 0x3c 0x40

To reset your network settings along with the factory reset, use the following IPMICFG command:

$ ipmicfg -fde

Occasionally your OS may fail to reset the BMC to factory defaults, due to architectural limitations. If you encounter any errors when attempting to reset the BMC, you may need to boot into a DOS environment instead. Attached is a pre-compiled DOS boot image with IPMICFG included, which you can write to a USB or CD.

Download ipmicfg.iso