
Kubernetes Tutorials (1)
Kubernetes Tutorials (1)
Install CoreOS with ISO
What is CoreOS Container Linux and Why
A lightweight Linux operating system designed for clustered deployments providing automation, security, and scalability for most critical applications.


So basically except some core part of the Linux distribution, like the kernel, systemd, sshd, docker, rkt those which will be pre-installed in the CoreOS container linux, the others app all will be deployed as a container , even ping.
- First Container optimized OS.
- Linux based and based on concepts from ChromeOS
- OS is Security focused.
- Auto Update OS with A/B partition
- OS is Open Source. Along with OS, CoreOS has following components:
- Systemd as Init system
- Etcd as distributed database
- Flannel for Container networking
- Docker, Rkt for Containers
- CoreOS integrates well with Kubernetes
___
Environment Preparation
Environment
Make Sure both server can access internet via ping 8.8.8.8.
    DNS:            10.10.116.202
    NTP:            10.1.37.52
    centos1 ip:     10.1.51.11/25
    coreos1 ip:     10.1.51.12/25
    GATEWAY:        10.1.51.1
| ServerName | IP ADDRESS | VCPU | MEMORY(GB) | DISK(GB) |
|---|---|---|---|---|
| CENTOS1 | 10.1.51.11 | 2 | 4 | 20 |
| COREOS1 | 10.1.51.12 | 2 | 4 | 20 |
Step by Step on install CoreOS
Reference - CoreOS Installing to disk
CENTOS1 Part
1: Install CentOS 7 on centos1 and Disable Selinux
Any CentOS 7 should work.
Note: If you don’t know how to install CentOS 7. Here is a Step by Step guild.
Disable Selinux
Login into centos01
[root@centos1 ~]#
2: Generating a pair of Public/Private SSH Access Keys
Make a new folder to save the Public/Private keys.
[root@centos1 ~]# mkdir /root/CoreOS
Using below command to generate the ssh key.
Replacing
{EmailAddress}with your own email address, e.g.,Jude.X.Zhu@newegg.com
ssh-keygen -t rsa -b 2048 -C "{EmailAddress}"
Set the passphrase to double secure the ssh access.
[root@centos1 ~]# ssh-keygen -t rsa -b 2048 -C "jude.x.zhu@newegg.com"
Generating public/private rsa key pair.
Enter file in which to save the key (/root/.ssh/id_rsa): /root/CoreOS/coreos
Enter passphrase (empty for no passphrase):
Enter same passphrase again:
Your identification has been saved in /root/CoreOS/coreos.
Your public key has been saved in /root/CoreOS/coreos.pub.
The key fingerprint is:
c4:a1:b6:0b:6e:7b:43:5e:bc:00:32:c7:20:ab:fc:06 jude.x.zhu@newegg.com
The key's randomart image is:
+--[ RSA 2048]----+
|        .        |
|. .    o .       |
| o o  o o        |
|. o +. o         |
|o  +....S        |
|.E . .o.o        |
|  o oo.o .       |
|   + .+ .        |
|  . .. .         |
+-----------------+
[root@centos1 ~]#
Confirm the public/private rsa key pair.
[root@centos1 ~]# ls -al /root/CoreOS/
total 8
drwxr-xr-x. 2 root root   38 Jun 15 08:42 .
dr-xr-x---. 3 root root  149 Jun 15 08:40 ..
-rw-------. 1 root root 1766 Jun 15 08:42 coreos
-rw-r--r--. 1 root root  403 Jun 15 08:42 coreos.pub
[root@centos1 ~]# cat /root/CoreOS/coreos.pub
ssh-rsa AAAAB3NzaC1yc2EAAAADAQABAAABAQDV/DpQ8veDFrOBCZcCzVnOJhLunhOTlYctErXZ0kXXGK42D6TOD26plQK8UTwEko/Az89KhUZEHKImJmiSfmuPbUr0LlIwL7c0z0mHmXxZXUNBz4oDraz5YplXG27YJhNgqomL1l8vFcp4KZRnnHCd47K7s3ISAnRvlKD59nEB3iLFN25iLgqE015RkzVoOOcQn+dxf535jpsWqSNj4IzLQTQP0+RAa91f25cAef3nP9nV8BQFeQsrNhVWeLqcxsugsrBdqnd4MpPooHKJ7FmA4uqn/AHXZLeRK6l+CdLXlaCeOnVYWrzRkPbW+MnpsOBQSdM7djdwpWp9cJeVAvTL jude.x.zhu@newegg.com
[root@centos1 ~]#
3: Create Cloud-init Config File
Cloud-init Config File
Cloud config init file examples
vi /root/CoreOS/cloud-config.yaml
Copy and Paste below content.
/root/CoreOS/cloud-config.yaml
#cloud-config
#
##hostname
hostname: "{CoreOS-Hostname}"

# include one or more SSH public keys
ssh_authorized_keys:
  - {Public-Key-Content}
# Network
coreos:
  units:
    - name: 00-internal.network
      runtime: true
      content: |
        [Match]
        Name={NIC-Name}

        [Network]
        DNS={DNS}
        Address={IPADDR}
        Gateway={GATEWAY}

    - name: settimezone.service
      command: start
      content: |
        [Unit]
        Description=Set the time zone

        [Service]
        ExecStart=/usr/bin/timedatectl set-timezone {TimeZone}
        RemainAfterExit=yes
        Type=oneshot
    - name: update-engine.service
      mask: true
    - name: locksmithd.service
      mask: true
write_files:
  - path: /etc/systemd/timesyncd.conf
    content: |
      [Time]
      NTP={NTP}
Replacing up variables with your own environment values.
{CoreOS-Hostname}:      Server Hostname. e.g., coreos1
{Public-Key-Content}:   The content of your public key which was generated in previous step.
{NIC-Name}:             Network Card Name. e.g., ens160
{DNS}:                  DNS IP ADDRESS. e.g, 10.10.116.202
{IPADDR}:               IP ADDRESS. e.g., 10.1.51.12/25
{TimeZone}:             TimeZone, using "timedatectl list-timezones" on CentOS 7 to list and find your own timezone value. e.g., America/Los_Angeles
{NTP}:                  NTP Server Addresses, separate with space. e.g., 10.1.37.52
Here is an example with values inside it;
/root/CoreOS/cloud-config.yaml
#cloud-config
#
##hostname
hostname: "coreos1"

# include one or more SSH public keys
ssh_authorized_keys:
  - ssh-rsa AAAAB3NzaC1yc2EAAAADAQABAAABAQDV/DpQ8veDFrOBCZcCzVnOJhLunhOTlYctErXZ0kXXGK42D6TOD26plQK8UTwEko/Az89KhUZEHKImJmiSfmuPbUr0LlIwL7c0z0mHmXxZXUNBz4oDraz5YplXG27YJhNgqomL1l8vFcp4KZRnnHCd47K7s3ISAnRvlKD59nEB3iLFN25iLgqE015RkzVoOOcQn+dxf535jpsWqSNj4IzLQTQP0+RAa91f25cAef3nP9nV8BQFeQsrNhVWeLqcxsugsrBdqnd4MpPooHKJ7FmA4uqn/AHXZLeRK6l+CdLXlaCeOnVYWrzRkPbW+MnpsOBQSdM7djdwpWp9cJeVAvTL jude.x.zhu@newegg.com
# Network
coreos:
  units:
    - name: 00-internal.network
      runtime: true
      content: |
        [Match]
        Name=ens160

        [Network]
        DNS=10.10.116.202
        Address=10.1.51.12/25
        Gateway=10.1.51.1

    - name: settimezone.service
      command: start
      content: |
        [Unit]
        Description=Set the time zone

        [Service]
        ExecStart=/usr/bin/timedatectl set-timezone America/Los_Angeles
        RemainAfterExit=yes
        Type=oneshot
    - name: update-engine.service
      mask: true
    - name: locksmithd.service
      mask: true
write_files:
  - path: /etc/systemd/timesyncd.conf
    content: |
      [Time]
      NTP=10.1.37.52
4: Start httpd service
Install and start the Apache httpd service.
yum install -y httpd

systemctl enable httpd --now
Allow httpd service port through firewall.
firewall-cmd --permanent --add-service=http
firewall-cmd --reload
Copy /root/CoreOS to httpd root folder.
cp -r /root/CoreOS /var/www/html/
Confirm
Use ‘Curl’ to check the Link
curl http://10.1.51.11/CoreOS/cloud-config.yaml
Replace
10.1.51.11with your own IP address.
COREOS1 Part
We’ve done the part of the centos1, let’s work on CoreOS installation now.
5: Download CoreOS ISO
Download the CoreOS ISO file from Here.
6: Boot coreos1 from CoreOS ISO you download
https://stable.release.core-os.net/amd64-usr/current/coreos_production_iso_image.iso
6: Set IP address, Gateway and DNS
Use ip a command to list the nic card,
Set the ip, gateway for coreos1
sudo ifconfig ens160 10.1.51.12 netmask 255.255.255.128
sudo route add default gw 10.1.51.1
Replace
10.1.51.12and10.1.51.1with your own values.
You can use ip a and ping to check the connectivity of your coreos1.e.g., ping 8.8.8.8 to check internet.
Add DNS
echo 'nameserver 8.8.8.8' | sudo tee --append /etc/resolv.conf
7: Download cloud-config.yaml
Download cloud-config.yaml to your coreos1.
wget http://10.1.51.11/CoreOS/cloud-config.yaml
ATTENSION!!!: If you change the
cloud-config.yamllater. Don’t forget copy this file to/var/www/html/to replace the old one.
Modify the variables inside the cloud-config.yaml if you need.
8: Install CoreOS to the disk
Run
sudo coreos-install -C stable -d /dev/sda -c cloud-config.yaml
After you see Success! CoreOS stable XXXX.X.X is installed on /dev/sda.
reboot the server.
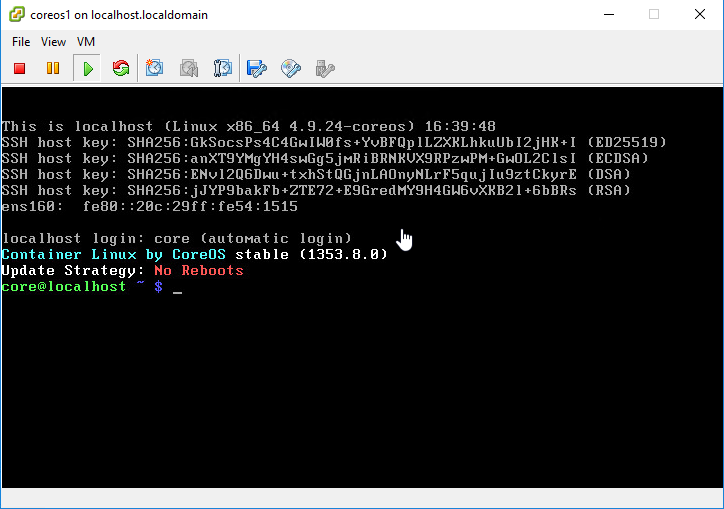
9: Verify
Go back to centos1
Replacing
10.1.51.12with your own ip address.
[root@centos1 ~]#
[root@centos1 ~]# ssh -i /root/CoreOS/coreos core@10.1.51.12
The authenticity of host '10.1.51.12 (10.1.51.12)' can't be established.
ECDSA key fingerprint is b9:53:6b:c4:77:8b:e1:9f:8d:c1:fc:48:fe:1c:0e:af.
Are you sure you want to continue connecting (yes/no)? yes
Warning: Permanently added '10.1.51.12' (ECDSA) to the list of known hosts.
Enter passphrase for key '/root/CoreOS/coreos':
Container Linux by CoreOS stable (1353.8.0)
core@coreos1 ~ $
core@coreos1 ~ $
core@coreos1 ~ $
core@coreos1 ~ $
core@coreos1 ~ $
Done
Extra
Using bash script to generate the cloud-config.yaml
Attention: If you’re not familiar with bash script, please ignore this part.
cloud-config-generator.sh
#!/bin/sh

#define parameters which are passed in.
echo -n "Please Enter HOSTNAME and press [ENTER]: "
read HOSTNAME

echo -n "Please Enter NIC Card Name and press [ENTER]: "
read NIC

echo -n "Please Enter DNS and press [ENTER]: "
read DNS

echo -n "Please Enter IP Address/CIDR block and press [ENTER]: "
read IPADDRESS

echo -n "Please Enter GATEWAY and press [ENTER]: "
read GATEWAY

echo -n "Please Enter NTP and press [ENTER]: "
read NTP

#define the template.
cat  << EOF
#cloud-config
#
##hostname
hostname: "${HOSTNAME}"

# include one or more SSH public keys
ssh_authorized_keys:
  - ${PUB_KEY}
# Network
coreos:
  units:
    - name: 00-internal.network
      runtime: true
      content: |
        [Match]
        Name=${NIC}

        [Network]
        DNS=${DNS}
        Address=${IPADDRESS}
        Gateway=${GATEWAY}

    - name: settimezone.service
      command: start
      content: |
        [Unit]
        Description=Set the time zone

        [Service]
        ExecStart=/usr/bin/timedatectl set-timezone ${TIMEZONE}
        RemainAfterExit=yes
        Type=oneshot
    - name: update-engine.service
      mask: true
    - name: locksmithd.service
      mask: true
write_files:
  - path: /etc/systemd/timesyncd.conf
    content: |
      [Time]
      NTP=${NTP}
EOF
How to Use
Export the env variables first.
export PUB_KEY=$(cat /root/CoreOS/coreos.pub)
export TIMEZONE=$(timedatectl | gawk -F': ' ' $1 ~ /Time zone/ {print $2}'| awk '{print $1}')
Then run the scripts with inputs.
Copy the output to a yaml file.
sh cloud-config-generator.sh
or
sh cloud-config-generator.sh > cloud-config.yaml
Kubernetes How It Works

Install Kubernetes 1.5.1 HA with kubeadm
ENV
Node IP
| Node | IP |
|---|---|
| s7kuberma01 | 10.1.51.31 |
| s7kuberma02 | 10.1.51.32 |
| s7kuberma03 | 10.1.51.33 |
| s7kubersla01 | 10.1.51.34 |
| s7kubersla02 | 10.1.51.35 |
vi /etc/hosts
10.1.51.31 s7kuberma01
10.1.51.32 s7kuberma02
10.1.51.33 s7kuberma03
10.1.51.34 s7kubersla01
10.1.51.35 s7kubersla02
architecture looks like this
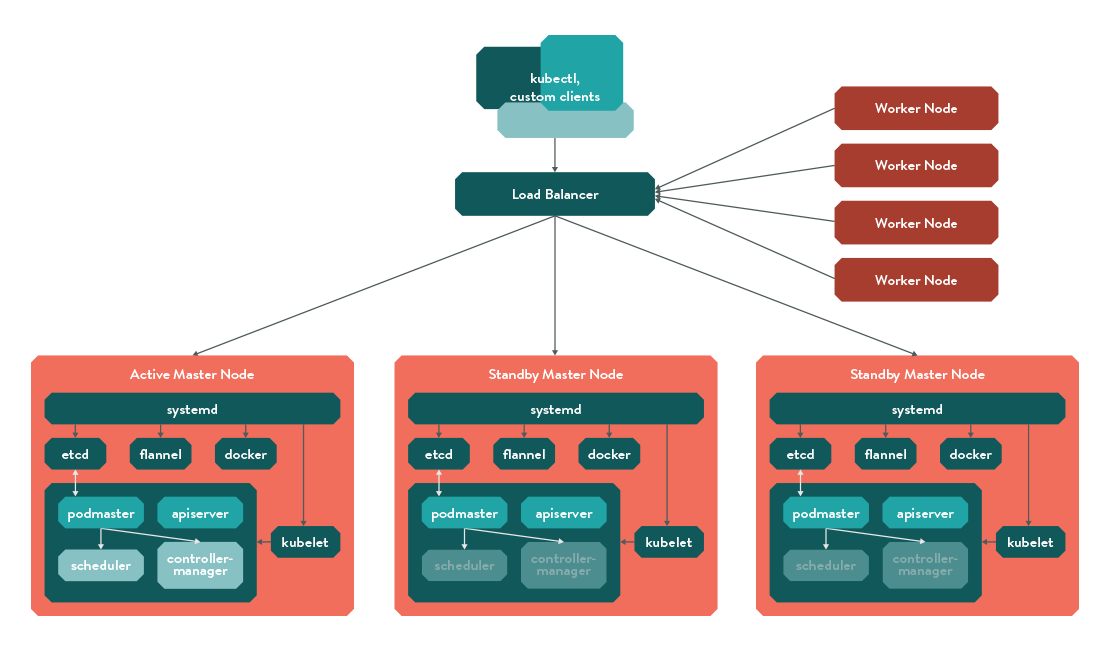
Master Nodes
install etcd cluster in the 3 master nodes
yum install -y etcd
Configuration
vi /etc/etcd/etcd.conf
s7kuberma01 etcd
# [member]
ETCD_NAME=s7kuberma01
ETCD_DATA_DIR="/var/lib/etcd/default.etcd"
#ETCD_WAL_DIR=""
#ETCD_SNAPSHOT_COUNT="10000"
#ETCD_HEARTBEAT_INTERVAL="100"
#ETCD_ELECTION_TIMEOUT="1000"
ETCD_LISTEN_PEER_URLS="http://10.1.51.31:2380"
ETCD_LISTEN_CLIENT_URLS="http://10.1.51.31:2379,http://localhost:2379"
#ETCD_MAX_SNAPSHOTS="5"
#ETCD_MAX_WALS="5"
#ETCD_CORS=""
#
#[cluster]
ETCD_INITIAL_ADVERTISE_PEER_URLS="http://10.1.51.31:2380"
# if you use different ETCD_NAME (e.g. test), set ETCD_INITIAL_CLUSTER value for this name, i.e. "test=http://..."
ETCD_INITIAL_CLUSTER="s7kuberma01=http://10.1.51.31:2380,s7kuberma02=http://10.1.51.32:2380,s7kuberma03=http://10.1.51.33:2380"
ETCD_INITIAL_CLUSTER_STATE="new"
ETCD_INITIAL_CLUSTER_TOKEN="etcd-cluster"
ETCD_ADVERTISE_CLIENT_URLS="http://10.1.51.31:2379"
s7kuberma02 etcd
# [member]
ETCD_NAME=s7kuberma02
ETCD_DATA_DIR="/var/lib/etcd/default.etcd"
#ETCD_WAL_DIR=""
#ETCD_SNAPSHOT_COUNT="10000"
#ETCD_HEARTBEAT_INTERVAL="100"
#ETCD_ELECTION_TIMEOUT="1000"
ETCD_LISTEN_PEER_URLS="http://10.1.51.32:2380"
ETCD_LISTEN_CLIENT_URLS="http://10.1.51.32:2379,http://localhost:2379"
#ETCD_MAX_SNAPSHOTS="5"
#ETCD_MAX_WALS="5"
#ETCD_CORS=""
#
#[cluster]
ETCD_INITIAL_ADVERTISE_PEER_URLS="http://10.1.51.32:2380"
# if you use different ETCD_NAME (e.g. test), set ETCD_INITIAL_CLUSTER value for this name, i.e. "test=http://..."
ETCD_INITIAL_CLUSTER="s7kuberma01=http://10.1.51.31:2380,s7kuberma02=http://10.1.51.32:2380,s7kuberma03=http://10.1.51.33:2380"
ETCD_INITIAL_CLUSTER_STATE="new"
ETCD_INITIAL_CLUSTER_TOKEN="etcd-cluster"
ETCD_ADVERTISE_CLIENT_URLS="http://10.1.51.32:2379"
s7kuberma03 etcd
# [member]
ETCD_NAME=s7kuberma03
ETCD_DATA_DIR="/var/lib/etcd/default.etcd"
#ETCD_WAL_DIR=""
#ETCD_SNAPSHOT_COUNT="10000"
#ETCD_HEARTBEAT_INTERVAL="100"
#ETCD_ELECTION_TIMEOUT="1000"
ETCD_LISTEN_PEER_URLS="http://10.1.51.33:2380"
ETCD_LISTEN_CLIENT_URLS="http://10.1.51.33:2379,http://localhost:2379"
#ETCD_MAX_SNAPSHOTS="5"
#ETCD_MAX_WALS="5"
#ETCD_CORS=""
#
#[cluster]
ETCD_INITIAL_ADVERTISE_PEER_URLS="http://10.1.51.33:2380"
# if you use different ETCD_NAME (e.g. test), set ETCD_INITIAL_CLUSTER value for this name, i.e. "test=http://..."
ETCD_INITIAL_CLUSTER="s7kuberma01=http://10.1.51.31:2380,s7kuberma02=http://10.1.51.32:2380,s7kuberma03=http://10.1.51.33:2380"
ETCD_INITIAL_CLUSTER_STATE="new"
ETCD_INITIAL_CLUSTER_TOKEN="etcd-cluster"
ETCD_ADVERTISE_CLIENT_URLS="http://10.1.51.33:2379"
Enable and start etcd cluster
systemctl enable etcd;systemctl start etcd
Check etcd cluster health
etcdctl cluster-health
member 605710dd5e542748 is healthy: got healthy result from http://10.1.51.33:2379
member 73eb2e8e208fa18f is healthy: got healthy result from http://10.1.51.32:2379
member b7760aa41c6d87b3 is healthy: got healthy result from http://10.1.51.31:2379
cluster is healthy
now we have an externel etcd cluster “–external-etcd-endpoints=http://10.1.51.31:2379,http://10.1.51.32:2379,http://10.1.51.33:2379” for kubernetes
Install Kubeadm on the s7kuberma01
repo
cat <<EOF > /etc/yum.repos.d/kubernetes.repo
[kubernetes]
name=Kubernetes
baseurl=http://yum.kubernetes.io/repos/kubernetes-el7-x86_64
enabled=1
gpgcheck=1
repo_gpgcheck=1
gpgkey=https://packages.cloud.google.com/yum/doc/yum-key.gpg
       https://packages.cloud.google.com/yum/doc/rpm-package-key.gpg
EOF
selinux
setenforce 0
install the packages and enable the services
yum install -y docker kubelet kubeadm kubectl kubernetes-cni
systemctl enable docker && systemctl start docker
systemctl enable kubelet && systemctl start kubelet
VIP
now we prepare to init our kubernetes with the kubeadm tools
but first, for we’re trying to deploy an HA env, we have to use the vip for the HA masters which is “10.1.51.30”, we will achieve this later with “Keepalived”, for right now , let’s just add it in the s7kuberma01.
ip addr add 10.1.51.30/25 dev ens160
and check the IP addresses
ip a
1: lo: <LOOPBACK,UP,LOWER_UP> mtu 65536 qdisc noqueue state UNKNOWN
    link/loopback 00:00:00:00:00:00 brd 00:00:00:00:00:00
    inet 127.0.0.1/8 scope host lo
       valid_lft forever preferred_lft forever
    inet6 ::1/128 scope host
       valid_lft forever preferred_lft forever
2: ens160: <BROADCAST,MULTICAST,UP,LOWER_UP> mtu 1500 qdisc mq state UP qlen 1000
    link/ether 00:0c:29:4d:0a:87 brd ff:ff:ff:ff:ff:ff
    inet 10.1.51.31/25 brd 10.1.51.127 scope global ens160
       valid_lft forever preferred_lft forever
    inet 10.1.51.30/25 scope global secondary ens160
       valid_lft forever preferred_lft forever
    inet6 fe80::20c:29ff:fe4d:a87/64 scope link
       valid_lft forever preferred_lft forever
3: docker0: <NO-CARRIER,BROADCAST,MULTICAST,UP> mtu 1500 qdisc noqueue state DOWN
    link/ether 02:42:c3:25:5c:ad brd ff:ff:ff:ff:ff:ff
    inet 172.17.0.1/16 scope global docker0
       valid_lft forever preferred_lft forever
you can see ,now we have both the “10.1.51.30” and “10.1.51.31” on the nic card “ens160” now
Kubeadm init
kubeadm init --api-advertise-addresses=10.1.51.30 --external-etcd-endpoints=http://10.1.51.31:2379,http://10.1.51.32:2379,http://10.1.51.33:2379 --pod-network-cidr 10.244.0.0/16
3 parameters have been used here
- API server pionted to the VIP which is 10.1.51.30
- use the external etcd cluster
- for we will install network addon flannel later , have to set the pod network as “10.244.0.0/16”
If everthing runs well, we should see output like this
Your Kubernetes master has initialized successfully!

You should now deploy a pod network to the cluster.
Run "kubectl apply -f [podnetwork].yaml" with one of the options listed at:
    http://kubernetes.io/docs/admin/addons/

You can now join any number of machines by running the following on each node:

kubeadm join --token=2dd145.8c687822f02702f1 10.1.51.30
Add two more Master nodes
install Packages
install kubelet kubeadmin in the s7kuberma02 s7kuberma03 , but dont start the services, use the same repo
yum install -y docker kubelet kubeadm kubectl kubernetes-cni
copy /etc/kubernetes from s7kuberma01 to 02 and 03 and start the kubelet
scp -r 10.1.51.31:/etc/kubernetes/* /etc/kubernetes/
start docker and kubelet on s7kuberma02 03
systemctl enable docker && systemctl start docker
systemctl enable kubelet && systemctl start kubelet
Deply the dns addons on all the masters
For deploy/kube-dns replicas only =1 ,so we need change 1 to 3 to achieve high availability
kubectl scale deploy/kube-dns --replicas=3 -n kube-system
install network addons
Download kube-flannel.yml from https://github.com/coreos/flannel/blob/master/Documentation/kube-flannel.yml
It should look like below:
---
kind: ConfigMap
apiVersion: v1
metadata:
  name: kube-flannel-cfg
  namespace: kube-system
  labels:
    tier: node
    app: flannel
data:
  cni-conf.json: |
    {
      "name": "cbr0",
      "type": "flannel",
      "delegate": {
        "isDefaultGateway": true
      }
    }
  net-conf.json: |
    {
      "Network": "10.244.0.0/16",
      "Backend": {
        "Type": "vxlan"
      }
    }
---
apiVersion: extensions/v1beta1
kind: DaemonSet
metadata:
  name: kube-flannel-ds
  namespace: kube-system
  labels:
    tier: node
    app: flannel
spec:
  template:
    metadata:
      labels:
        tier: node
        app: flannel
    spec:
      hostNetwork: true
      nodeSelector:
        beta.kubernetes.io/arch: amd64
      containers:
      - name: kube-flannel
        image: quay.io/coreos/flannel-git:v0.6.1-62-g6d631ba-amd64
        command: [ "/opt/bin/flanneld", "--ip-masq", "--kube-subnet-mgr" ]
        securityContext:
          privileged: true
        env:
        - name: POD_NAME
          valueFrom:
            fieldRef:
              fieldPath: metadata.name
        - name: POD_NAMESPACE
          valueFrom:
            fieldRef:
              fieldPath: metadata.namespace
        volumeMounts:
        - name: run
          mountPath: /run
        - name: flannel-cfg
          mountPath: /etc/kube-flannel/
      - name: install-cni
        image: quay.io/coreos/flannel-git:v0.6.1-62-g6d631ba-amd64
        command: [ "/bin/sh", "-c", "set -e -x; cp -f /etc/kube-flannel/cni-conf.json /etc/cni/net.d/10-flannel.conf; while true; do sleep 3600; done" ]
        volumeMounts:
        - name: cni
          mountPath: /etc/cni/net.d
        - name: flannel-cfg
          mountPath: /etc/kube-flannel/
      volumes:
        - name: run
          hostPath:
            path: /run
        - name: cni
          hostPath:
            path: /etc/cni/net.d
        - name: flannel-cfg
          configMap:
            name: kube-flannel-cfg
kubectl apply -f kube-flannel.yml
extend kube-discovery replicas to 3
kubectl scale deploy/kube-discovery --replicas=3 -n kube-system
lable master nodes
kubectl label node s7kuberma02.buyabs.corp kubeadm.alpha.kubernetes.io/role=master
kubectl label node s7kuberma03.buyabs.corp kubeadm.alpha.kubernetes.io/role=master
let’s check the kube-system pod to see if all the compoment runs well
[root@s7kuberma01 ~]# kubectl get pods -n kube-system
dummy-2088944543-481qm                            1/1       Running   0          27m
kube-apiserver-s7kuberma01.buyabs.corp            1/1       Running   0          28m
kube-apiserver-s7kuberma02.buyabs.corp            1/1       Running   0          16m
kube-apiserver-s7kuberma03.buyabs.corp            1/1       Running   0          17m
kube-controller-manager-s7kuberma01.buyabs.corp   1/1       Running   0          28m
kube-controller-manager-s7kuberma02.buyabs.corp   1/1       Running   0          16m
kube-controller-manager-s7kuberma03.buyabs.corp   1/1       Running   0          17m
kube-discovery-1769846148-48z5n                   1/1       Running   0          27m
kube-discovery-1769846148-7ww6t                   1/1       Running   0          6m
kube-discovery-1769846148-z9c9w                   1/1       Running   0          6m
kube-dns-2924299975-3dlrn                         4/4       Running   0          16m
kube-dns-2924299975-5927t                         4/4       Running   0          16m
kube-dns-2924299975-cxgqf                         4/4       Running   0          27m
kube-flannel-ds-7ms01                             2/2       Running   0          12m
kube-flannel-ds-87cf8                             2/2       Running   0          12m
kube-flannel-ds-sqs8j                             2/2       Running   0          12m
kube-proxy-73c5r                                  1/1       Running   0          17m
kube-proxy-p52m2                                  1/1       Running   0          27m
kube-proxy-tfgrc                                  1/1       Running   0          17m
kube-scheduler-s7kuberma01.buyabs.corp            1/1       Running   0          27m
kube-scheduler-s7kuberma02.buyabs.corp            1/1       Running   0          16m
kube-scheduler-s7kuberma03.buyabs.corp            1/1       Running   0          17m
looks good to me
Keepalived
but now the VIP is only on the s7kuberma01, so we need install keepalived in the 3 master nodes to make sure one master down the others can handle the jobs.
Install Keepalived in all 3 master nodes
vi /etc/keepalived/keepalived.conf
s7kuberma01 keepalived configuration
vrrp_script CheckK8sMaster {
    script "curl -k https://10.1.51.31:6443"
    interval 3
    timeout 9
    fall 2
    rise 2
}

vrrp_instance VI_1 {
    state MASTER
    interface ens160
    virtual_router_id 61
    priority 115
    advert_int 1
    unicast_src_ip 10.1.51.31
    nopreempt
    authentication {
        auth_type PASS
        auth_pass 1234567890
    }
    unicast_peer {
        #10.1.51.31
        10.1.51.32
        10.1.51.33
    }
    virtual_ipaddress {
        10.1.51.30/25
    }
    track_script {
        CheckK8sMaster
    }

}
s7kuberma02 keepalived configuration
vrrp_script CheckK8sMaster {
    script "curl -k https://10.1.51.32:6443"
    interval 3
    timeout 9
    fall 2
    rise 2
}

vrrp_instance VI_1 {
    state BACKUP
    interface ens160
    virtual_router_id 61
    priority 114
    advert_int 1
    unicast_src_ip 10.1.51.32
    nopreempt
    authentication {
        auth_type PASS
        auth_pass 1234567890
    }
    unicast_peer {
        10.1.51.31
        #10.1.51.32
        10.1.51.33
    }
    virtual_ipaddress {
        10.1.51.30/25
    }
    track_script {
        CheckK8sMaster
    }

}
s7kuberma03 keepalived configuration
vrrp_script CheckK8sMaster {
    script "curl -k https://10.1.51.33:6443"
    interval 3
    timeout 9
    fall 2
    rise 2
}

vrrp_instance VI_1 {
    state BACKUP
    interface ens160
    virtual_router_id 61
    priority 113
    advert_int 1
    unicast_src_ip 10.1.51.33
    nopreempt
    authentication {
        auth_type PASS
        auth_pass 1234567890
    }
    unicast_peer {
        10.1.51.31
        10.1.51.32
        #10.1.51.33
    }
    virtual_ipaddress {
        10.1.51.30/25
    }
    track_script {
        CheckK8sMaster
    }

}
- “vrrp_script CheckK8sMaster” “curl -k https://10.1.51.31:6443” to check if the local server kuber-apiserver works
- s7kuberma01 “state MASTER” and the others two “state BACKUP”
- “priority 115” and decrease in 02,03
- change the related ip addresses
start keepalived and check the service status
systemctl enable keepalived;systemctl restart keepalived
check ip address
[root@s7kuberma01 ~]# ip a
1: lo: <LOOPBACK,UP,LOWER_UP> mtu 65536 qdisc noqueue state UNKNOWN
    link/loopback 00:00:00:00:00:00 brd 00:00:00:00:00:00
    inet 127.0.0.1/8 scope host lo
       valid_lft forever preferred_lft forever
    inet6 ::1/128 scope host
       valid_lft forever preferred_lft forever
2: ens160: <BROADCAST,MULTICAST,UP,LOWER_UP> mtu 1500 qdisc mq state UP qlen 1000
    link/ether 00:0c:29:4d:0a:87 brd ff:ff:ff:ff:ff:ff
    inet 10.1.51.31/25 brd 10.1.51.127 scope global ens160
       valid_lft forever preferred_lft forever
    inet 10.1.51.30/25 scope global secondary ens160
       valid_lft forever preferred_lft forever
    inet6 fe80::20c:29ff:fe4d:a87/64 scope link
       valid_lft forever preferred_lft forever
3: docker0: <NO-CARRIER,BROADCAST,MULTICAST,UP> mtu 1500 qdisc noqueue state DOWN
    link/ether 02:42:c3:25:5c:ad brd ff:ff:ff:ff:ff:ff
    inet 172.17.0.1/16 scope global docker0
       valid_lft forever preferred_lft forever
4: flannel.1: <BROADCAST,MULTICAST,UP,LOWER_UP> mtu 1450 qdisc noqueue state UNKNOWN
    link/ether d6:f2:0f:3c:14:a1 brd ff:ff:ff:ff:ff:ff
    inet 10.244.0.0/32 scope global flannel.1
       valid_lft forever preferred_lft forever
    inet6 fe80::d4f2:fff:fe3c:14a1/64 scope link
       valid_lft forever preferred_lft forever
5: cni0: <BROADCAST,MULTICAST,UP,LOWER_UP> mtu 1450 qdisc noqueue state UP
    link/ether 0a:58:0a:f4:00:01 brd ff:ff:ff:ff:ff:ff
    inet 10.244.0.1/24 scope global cni0
       valid_lft forever preferred_lft forever
    inet6 fe80::e4c5:bdff:fe59:b90d/64 scope link
       valid_lft forever preferred_lft forever
6: vethc7ea64c1@if3: <BROADCAST,MULTICAST,UP,LOWER_UP> mtu 1450 qdisc noqueue master cni0 state UP
    link/ether e6:c5:bd:59:b9:0d brd ff:ff:ff:ff:ff:ff link-netnsid 0
    inet6 fe80::e4c5:bdff:fe59:b90d/64 scope link
       valid_lft forever preferred_lft foreve
check the kubelet status
[root@s7kuberma01 ~]# systemctl status kubelet
● kubelet.service - kubelet: The Kubernetes Node Agent
   Loaded: loaded (/etc/systemd/system/kubelet.service; enabled; vendor preset: disabled)
  Drop-In: /etc/systemd/system/kubelet.service.d
           └─10-kubeadm.conf
   Active: active (running) since Fri 2017-01-13 07:34:03 PST; 2h 0min ago
     Docs: http://kubernetes.io/docs/
 Main PID: 2333 (kubelet)
   CGroup: /system.slice/kubelet.service
           ├─2333 /usr/bin/kubelet --kubeconfig=/etc/kubernetes/kubelet.conf --require-kubeconfig=true --pod-manifest-path=/etc/kubernetes/manifests --allow-privileged=true --network-plugin=cni --cni-conf-dir=/etc/cni/net.d --cni-bin-dir=/opt/cni/bin --cluster-dns=10...
           └─2385 journalctl -k -f

Jan 13 09:33:15 s7kuberma01.buyabs.corp kubelet[2333]: I0113 09:33:15.828445    2333 operation_executor.go:917] MountVolume.SetUp succeeded for volume "kubernetes.io/secret/e7f95c50-d9a5-11e6-80da-000c294d0a87-default-token-x1c6v" (spec.Name: "default-token-x1c6v") p...
Jan 13 09:33:22 s7kuberma01.buyabs.corp kubelet[2333]: I0113 09:33:22.853280    2333 operation_executor.go:917] MountVolume.SetUp succeeded for volume "kubernetes.io/configmap/148c9948-d9a8-11e6-80da-000c294d0a87-flannel-cfg" (spec.Name: "flannel-c...0da-000c294d0a87").
Jan 13 09:33:22 s7kuberma01.buyabs.corp kubelet[2333]: I0113 09:33:22.853334    2333 operation_executor.go:917] MountVolume.SetUp succeeded for volume "kubernetes.io/secret/148c9948-d9a8-11e6-80da-000c294d0a87-default-token-x1c6v" (spec.Name: "default-token-x1c6v") p...
Jan 13 09:33:41 s7kuberma01.buyabs.corp kubelet[2333]: I0113 09:33:41.824006    2333 operation_executor.go:917] MountVolume.SetUp succeeded for volume "kubernetes.io/secret/e80166d2-d9a5-11e6-80da-000c294d0a87-default-token-x1c6v" (spec.Name: "default-token-x1c6v") p...
Jan 13 09:34:27 s7kuberma01.buyabs.corp kubelet[2333]: I0113 09:34:27.892885    2333 operation_executor.go:917] MountVolume.SetUp succeeded for volume "kubernetes.io/secret/d9f40ad4-d9a5-11e6-80da-000c294d0a87-default-token-x1c6v" (spec.Name: "default-token-x1c6v") p...
Jan 13 09:34:34 s7kuberma01.buyabs.corp kubelet[2333]: I0113 09:34:34.818039    2333 operation_executor.go:917] MountVolume.SetUp succeeded for volume "kubernetes.io/secret/db71de39-d9a5-11e6-80da-000c294d0a87-clusterinfo" (spec.Name: "clusterinfo"...0da-000c294d0a87").
Jan 13 09:34:34 s7kuberma01.buyabs.corp kubelet[2333]: I0113 09:34:34.818046    2333 operation_executor.go:917] MountVolume.SetUp succeeded for volume "kubernetes.io/secret/db71de39-d9a5-11e6-80da-000c294d0a87-default-token-x1c6v" (spec.Name: "default-token-x1c6v) p...
Jan 13 09:34:38 s7kuberma01.buyabs.corp kubelet[2333]: I0113 09:34:38.832263    2333 operation_executor.go:917] MountVolume.SetUp succeeded for volume "kubernetes.io/configmap/148c9948-d9a8-11e6-80da-000c294d0a87-flannel-cfg" (spec.Name: "flannel-c...0da-000c294d0a87").
Jan 13 09:34:38 s7kuberma01.buyabs.corp kubelet[2333]: I0113 09:34:38.832812    2333 operation_executor.go:917] MountVolume.SetUp succeeded for volume "kubernetes.io/secret/e7f95c50-d9a5-11e6-80da-000c294d0a87-default-token-x1c6v" (spec.Name: "default-token-x1c6v") p...
Jan 13 09:34:38 s7kuberma01.buyabs.corp kubelet[2333]: I0113 09:34:38.832895    2333 operation_executor.go:917] MountVolume.SetUp succeeded for volume "kubernetes.io/secret/148c9948-d9a8-11e6-80da-000c294d0a87-default-token-x1c6v" (spec.Name: "default-token-x1c6v") p...
Hint: Some lines were ellipsized, use -l to show in full.
Add slave nodes
Run kubeadm join on the s7kubema02 and s7kubema03
[root@s7kubersla01 ~]# kubeadm join --token=2dd145.8c687822f02702f1 10.1.51.30
[kubeadm] WARNING: kubeadm is in alpha, please do not use it for production clusters.
[preflight] Running pre-flight checks
[tokens] Validating provided token
[discovery] Created cluster info discovery client, requesting info from "http://10.1.51.30:9898/cluster-info/v1/?token-id=2dd145"
[discovery] Cluster info object received, verifying signature using given token
[discovery] Cluster info signature and contents are valid, will use API endpoints [https://10.1.51.30:6443]
[bootstrap] Trying to connect to endpoint https://10.1.51.30:6443
[bootstrap] Detected server version: v1.5.2
[bootstrap] Successfully established connection with endpoint "https://10.1.51.30:6443"
[csr] Created API client to obtain unique certificate for this node, generating keys and certificate signing request
[csr] Received signed certificate from the API server:
Issuer: CN=kubernetes | Subject: CN=system:node:s7kubersla01.buyabs.corp | CA: false
Not before: 2017-01-13 17:41:00 +0000 UTC Not After: 2018-01-13 17:41:00 +0000 UTC
[csr] Generating kubelet configuration
[kubeconfig] Wrote KubeConfig file to disk: "/etc/kubernetes/kubelet.conf"

Node join complete:
* Certificate signing request sent to master and response
  received.
* Kubelet informed of new secure connection details.

Run 'kubectl get nodes' on the master to see this machine join.
check the nodes
[root@s7kuberma01 ~]# kubectl get nodes
NAME                       STATUS         AGE
s7kuberma01.buyabs.corp    Ready,master   2h
s7kuberma02.buyabs.corp    Ready,master   2h
s7kuberma03.buyabs.corp    Ready,master   2h
s7kubersla01.buyabs.corp   Ready          2m
s7kubersla02.buyabs.corp   Ready          5s
Setup Infiniband on CentOS 7
Just a quick note about how to config Infiniband
###install
yum -y groupinstall "Infiniband Support"
yum -y install infiniband-diags perftest gperf
###Uninstall
yum -y groupremove "Infiniband Support"
###Starting the RDMA services
systemctl start rdma
systemctl enable rdma
###config ib0
vi /etc/sysconfig/network-scripts/ifcfg-ib0

DEVICE=ib0
TYPE=infiniband
BOOTPROTO=static
IPADDR=192.168.4.62
NETMASK=255.255.255.0
NETWORK=192.168.4.0
BROADCAST=192.168.4.255
ONBOOT=yes
NM_CONTROLLED=no

systemctl restart network